Home made granola – A healthy way to start your day

DSC_0348

Are you the type of person that starts the day with a bowl of cereal?
I recently learned through a random newspaper article that cereals still remain the number one breakfast-choice for people in the Western world. I have never been one of those people and it made me wonder why?
After some thinking I came up with the following 3 reasons:

1. Most cereals taste artificial and seem very unhealthy to me. When I looked up the facts, I learned that my initial hunch was right. The overall majority of breakfast cereal, in their attractive colorful boxes, have little to no nutritional value and to make things worse, they are packed with sugar (sometimes as much as 40%). This is not only true for all children’s cereal, like Coco puffs and Kellog’s Frosties, but also for most common brand granola’s. Nobody thinks sugary (chocolate) biscuits make a healthy and nutritious breakfast right, so why would you eat these cereals?

2. On the other side of the cereal-spectrum you have (organic) muesli with nuts and dried fruit. Although this is actually a healthy breakfast option, full of fibers, vitamins and minerals, it unfortunately also tastes way too healthy to me. Do not get me wrong here, because I fully support choosing the healthiest option available, but I do have my limits. Whenever I eat muesli, I can not help but think that I am eating something that should have been fed to cattle instead…

3. Somewhere in the middle of all of this you can find organic granola. I prefer granola over muesli because it has a nice crunch to it and it is usually a bit sweeter. Because most organic granola’s are sweetened with honey instead of sugar or (corn)syrup it also makes them a slightly healthier option. Whenever I do eat granola, I always feel like the ratio between oats and the good stuff (nuts, seeds,raisins etc.) is off. Surely I understand that ‘the good stuff’ is what makes the granola expensive, but I would not mind paying a little more if that meant it also tasted better…

After all this thinking, my findings soon led me to believe there was a solution to my problems:
I should make my own granola, exactly the way I would like to eat it!
Is it really worth going through all that trouble you might ask?  I believe the answer to that question is simple:
responsibly made granola is not only very tasty but also a good addition to a healthy diet. Granola contains fibers which are important for digestion and will make you feel full for longer. That way you won’t start craving (unhealthy) snacks early in the day before lunch. The oats, seeds and fruits in the granola are full of antioxidants, vitamins and minerals that we need in order to stay healthy. On top of the health argument it is also very easy and surprisingly fun thing to do (also with little kids!) Are you convinced?

This is how to make your own home made granola:

When I decdied to make my own healthy granola, I did not cut corners and went for only organic ingredients. I will warn you in advance that it is not cheap to buy 8-10 different kinds of oats, nuts and seeds, but my guess is that you can make at least 6-8 kilo’s of granola with the ingredients that I got, so I think it is worth it.

Please note that you can use any oats, seeds, dried fruit that you like (cranberries, abricots etc.)
You can even add dark chocolate to your granola as long as you remember to add it after baking.

My recipe makes about 1 kg of granola.

Preheat your oven to 150 degrees Celsius and line a baking tray with baking paper.

Dry ingredients:

250 grams raw rolled oats (high in fibers, complex carbohydrates and protein)
250 grams raw buckwheat (high in fibres, Vitamins B1 and B6 and minerals such as magnesium)
75 grams broken flaxseed (full of nutrients, omega-3 fatty acids, antioxidants, minerals and vitamin E)
– 1 cup of chopped almonds (a good source of vitamin E and B-complex and has cholesterol-lowering properties)
– 1 cup of shredded coconut (high in fibres and a good source of B-complex vitamins)
– 1 cup of white mulberries (high in vitamin C, iron and several anti-oxidants that boost the immune system)
– 1 cup of pumpkin seeds (high in zinc, manganese, magnesium and vitamin E)
– 1 cup of raisins (a good source of energy, resveratrol, electrolytes and minerals)
– 1 cup of chia seeds (not on the picture) (high in fibers, omega 3 and calcium)
– zest of 1 organic orange (high in Vitamin C and essential minerals like calcium, magnesium and zinc)

Wet ingredients:

– 4 tablespoons vegetable oil (I used coconut oil which is great because it has no odor or flavor,but you do need to heat it first to make it become liquid. You can also use groundnut oil or another type of vegetable oil that can be heated)
– 8 tablespoons (organic) honey

granolalast

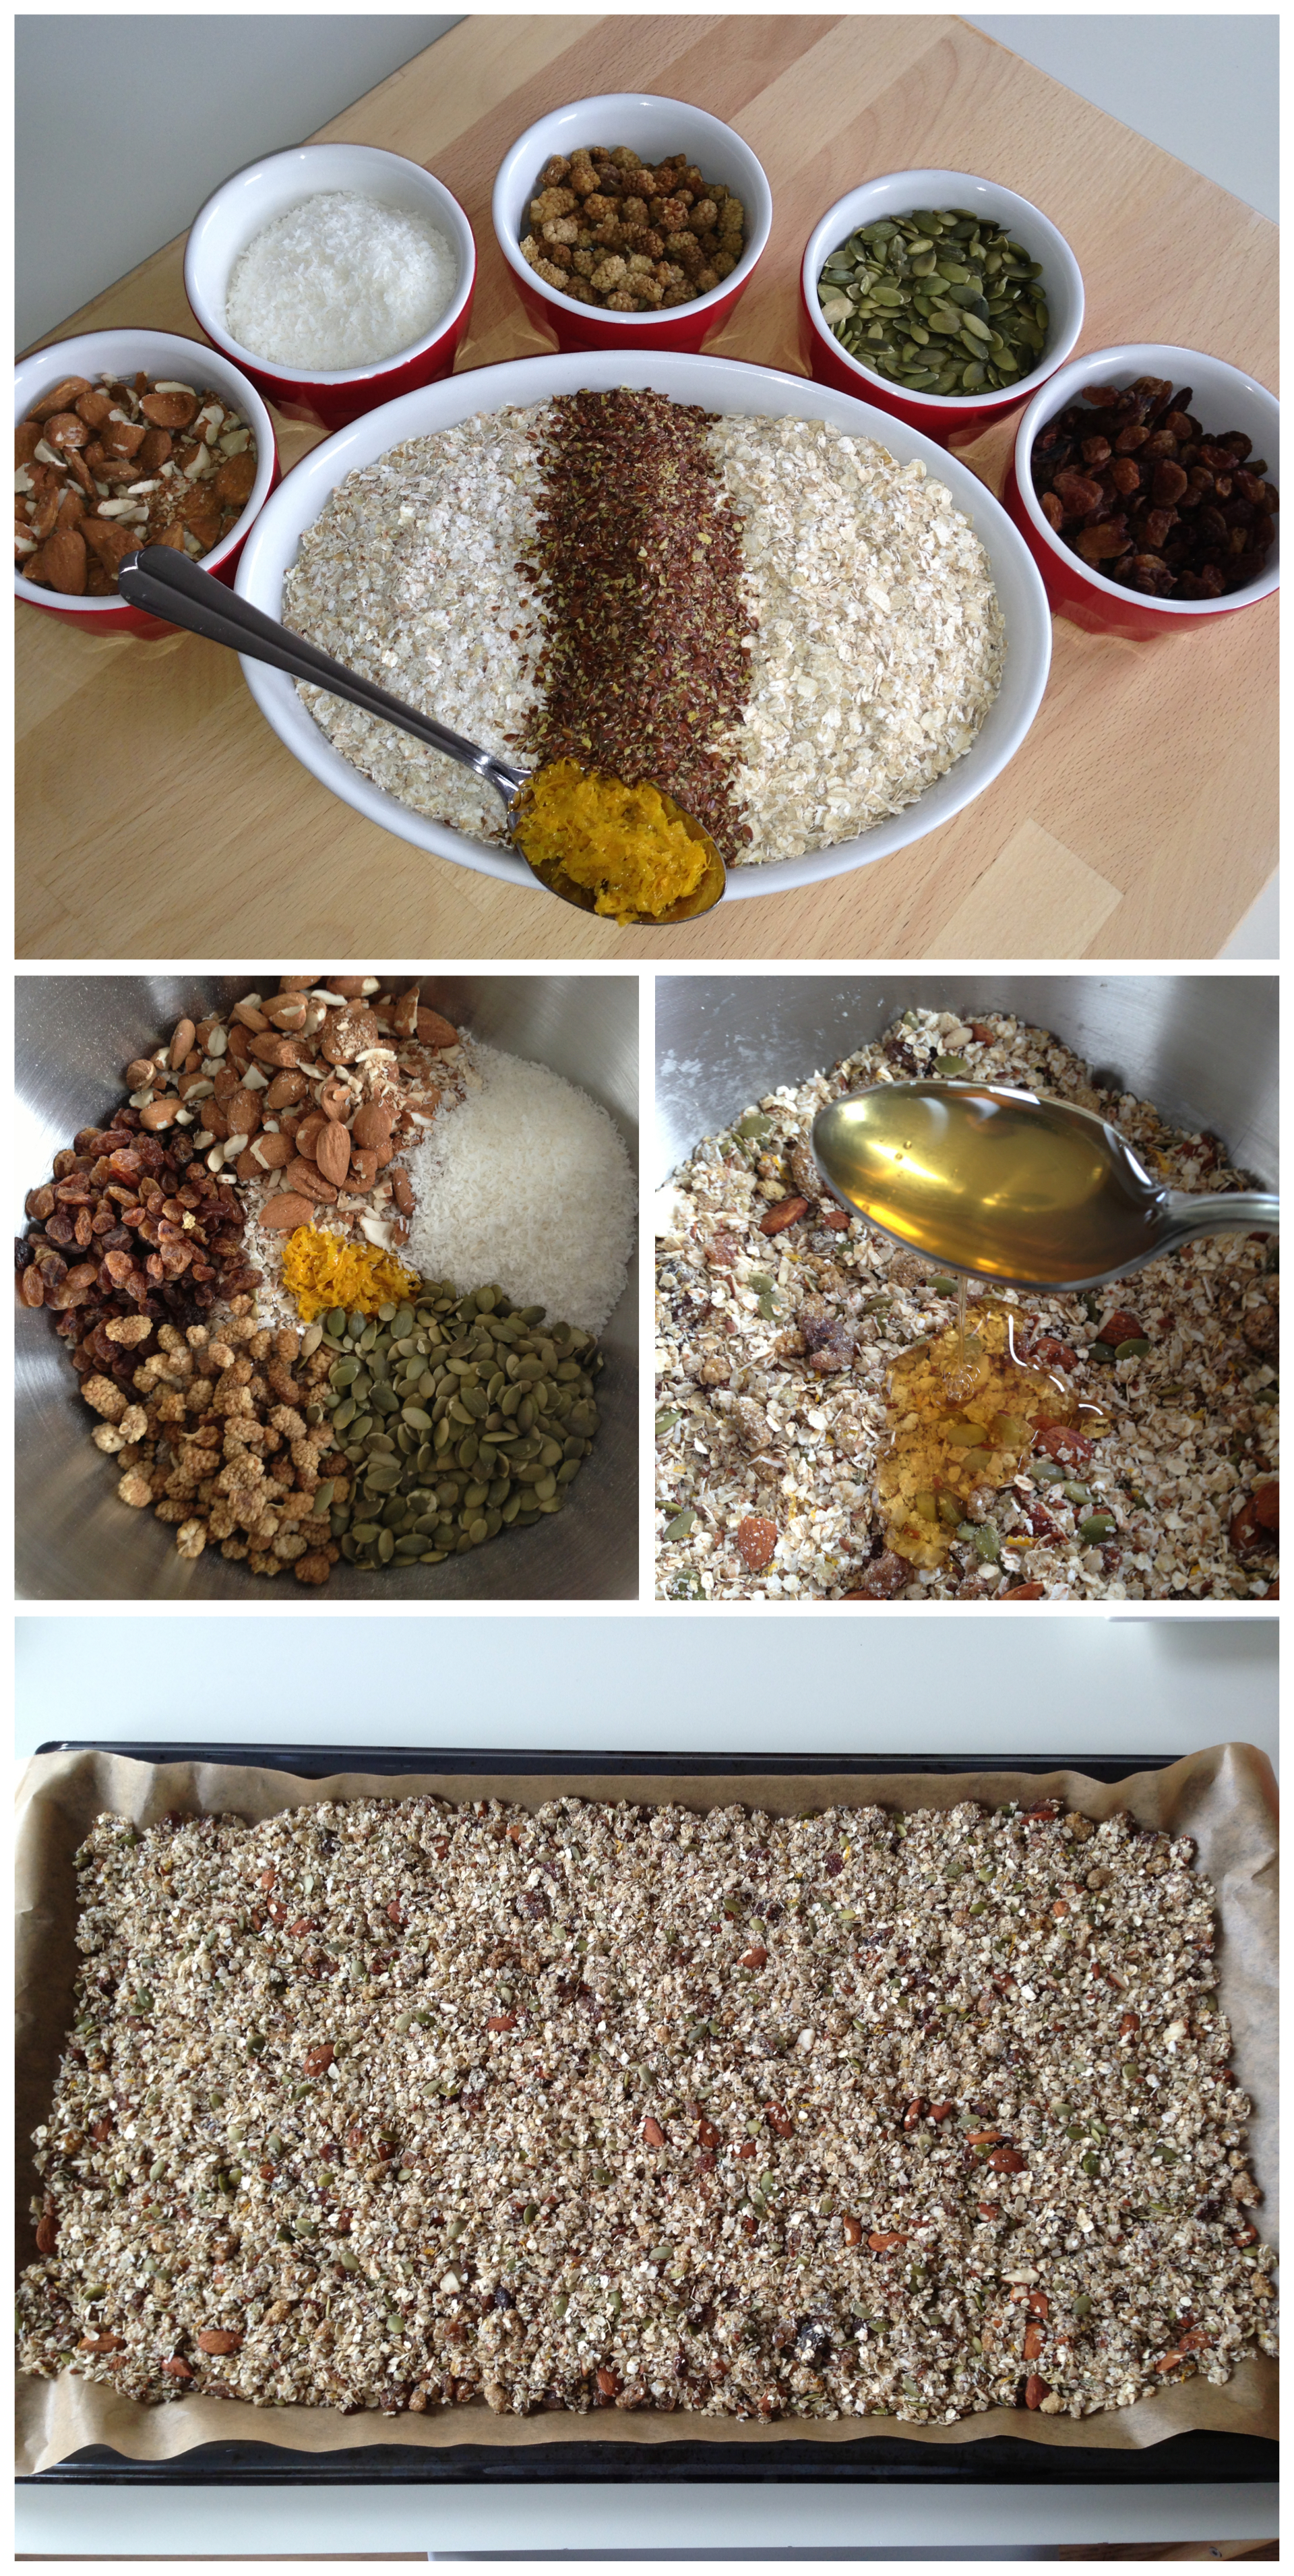
Start by mixing all the dry ingredients together in a big bowl. Then gradually add the coconut oil and the honey to the mixture and stir until all the grains are covered with the liquid. You might think that the mixture still seems very dry, but this is how it should look. Now pour the mixture on a baking tray and spread it out (because I have a large oven I managed to get everything on one baking tray, if you have a smaller oven you might want to split the mixture in half and repeat this process twice). Press the mixture together with the back of a spoon and put the tray in the oven for 25-35 minutes. Stir the mixture every 5-10 minutes to make sure that the oats bake evenly. When the oats turn golden brown and you begin to smell that something is baking, you take the tray out of the oven and let it cool. Do not touch the mixture before it is cooled completely and it has set. When it is cooled you can break the granola in to chuncks/pieces and store it in an airtight container or mason jar.

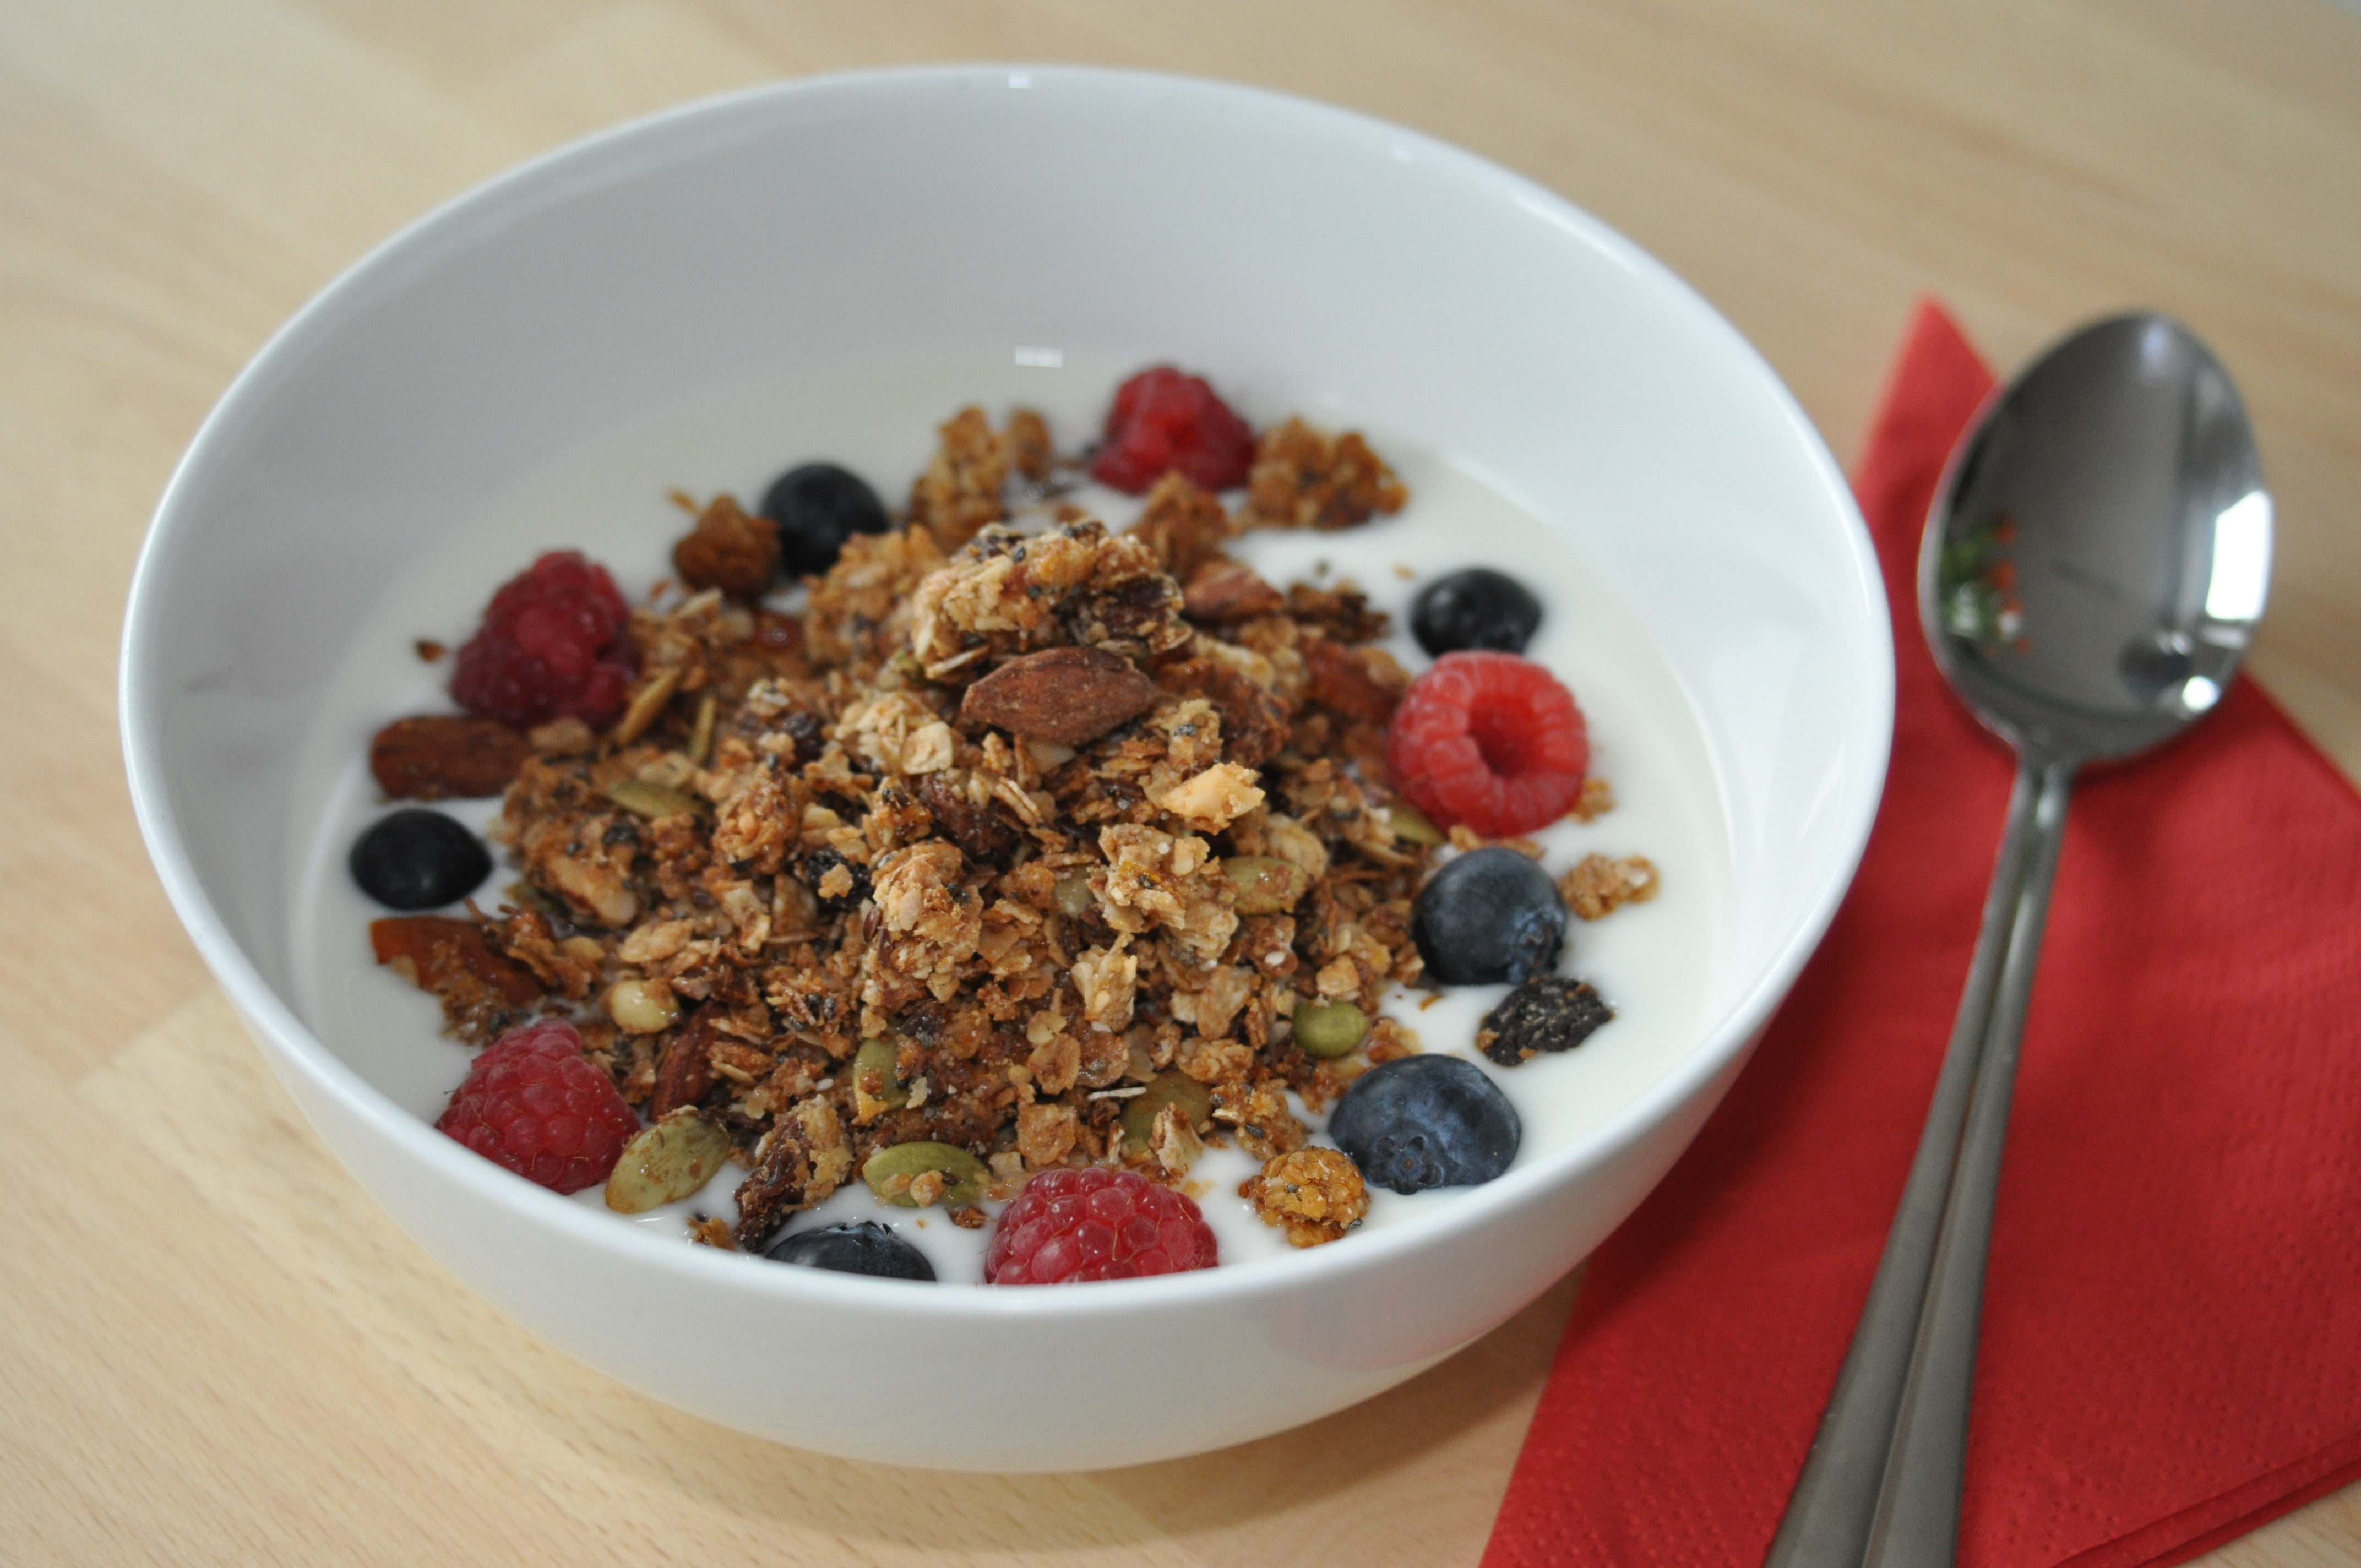
Now you have made yourself a delicious and nutritious breakfast! Just add some seasonal fruit to your bowl each morning and some (soy)milk or yoghurt and you can be sure that you have started your day in a healthy way.

Please let me know what ingredients you come up with to put in your favorite granola, the possibilities are endless!

It’s a girl! – Baby shower cupcakes

cupcakes two white

Ever since I was very young, I have been a huge fan of baking. I enjoy baking all sorts of cakes, pies and cookies, but the last few years I have been really into making cupcakes.  Although the rise in popularity of the cupcake seems to be declining again, I do not believe that the cupcake craze is totaly over and I doubt it ever will. For me, cupcakes are still the perfect party treat. Somehow these little cakes with their delicious and colorful frosting posses the power to make any party feel extra festive. Having one (or two) pretty cupcake(s) all to yourself just make you feel very special and spoiled, don’t you agree?

When I was recently asked to bake a cake for the baby-shower of my good friends, Aisha and Gijs, it did not take me long to decide that I would be making baby-themed cupcakes. Because they are expecting a little girl, I knew pink would have to be my color.

I have made many different cupcakes over the years and my starting point for recipes has always been: http://www.joyofbaking.com This American website provides every baking and dessert recipe you can possible think of and offers clear and elaborate descriptions and videos. For this special baking-occasion I decided to make red velvet and lemon-vanilla cupcakes, but not before I stocked up on all the pink things I could possibly find.

cupcakes white

Although the taste and texture of the red velvet cupcakes was good, I felt like they could have risen a little bit more. Another thing I did not like about this recipe was that instead of making the promised 24, I only managed to squeeze out 15 out of the batter. I have made red velvet cakes before, but I have yet to find the perfect recipe. However I will not give up my search because red velvet is one of my all time favorite flavors. So, if you have the perfect recipe please let me know!

The recipe for these delicious lemon-vanilla cupcakes on the other hand is a definite no-fail. I have made these several times now and I promise you that, if you stick to the recipe below, they will come out perfect. The original recipe does not call for lemon zest nor the seeds of a vanilla pod, but I think it makes the cupcakes taste a lot more special and interesting than an ordinary vanilla cupcake.

Before you start baking I have one big recommendation; as opposed to cooking, there is absolutely no room for guesstimating when it comes to measuring ingredients for baking. Because few things are worse for moral than a failed baking-experiment, I suggest you regard this purchase as a vital investment for your mental well-being. Digital kitchen scales only cost about 15-20 euros nowadays and they make a big difference in your baking results.

How to make lemon-vanilla cupcakes:

– 195 grams all purpose flour
– 200 grams granulated white sugar
– 1 1/2 teaspoons of baking powder
– 1/4 teaspoon of salt
– 113 grams of unsalted butter at room temperature cut into small pieces
– 2 large eggs
– 1 teaspoon pure vanilla extract
– the seeds of 1 vanilla pod
– the zest of 1 organic lemon
– 120 ml of plain yoghurt

Preheat the oven to 180 degrees Celcius and line 12 muffin cups with paper liners.

In the bowl of your electric mixer beat the flour, sugar, baking powder, and salt until combined. Add the butter, eggs, vanilla extract, and yogurt. Now beat the wet and dry ingredients together, at medium speed, until the batter is smooth and satiny, about 30 – 60 seconds. Scrape down the sides of the bowl and give it one more mix to make sure all the ingredients are combined properly.

Evenly fill the muffin cups with the batter. I prefer to use an ice-scream scoop so that all the batter actually ends up in the paper liners. This scooping-method also ensures that you end up with cupcakes of approximately the same size. Bake for about 20 – 25 minutes or until lightly browned and a toothpick inserted into a cupcake comes out clean. I always like to cook my cupcakes as short as possible to ensure that they stay nice and moist inside. There is nothing worse than a dry (cup)cake. Once they are done, remove them from the oven and place them on a wire rack to cool.

How to make cream cheese & whipped cream frosting:

– 227 grams of cream cheese (make sure you get plain cream cheese without onion and chives)
– 1/2 teaspoon pure vanilla extract
– 60 grams confectioners’ (icing or powdered) sugar
– 160 ml cold heavy whipping cream (double cream)
– a few drops of pink food coloring

First beat the double cream to peaks. Beat the cream cheese in the bowl of your electric mixer until smooth. Add the vanilla and confectioners sugar and beat until smooth. Gradually add the heavy cream and whip until the frosting is thick enough to pipe. Add more sugar or cream as needed to get the right consistency. For the last step, add the food coloring one drop at a time. You really only need a few drops to get the right color. Place the frosting back in the refrigerator for at least 30 minutes to an hour to make sure it is really cold before you start piping.

For the piping you will need a piping bag and a piping mouth. For these cupcakes I used a big size mouth but you can use whatever size or shape you think will look nice. If you do not own a piping bag, you can also use a spatula to cover the cupcakes, however this will not look as pretty. Piping does requires a little practice but once you master it, it is the most fun thing in the world! For making the cut-outs on top of the red velvet cupcakes I used rolled out pink fondant and baby-themed cookie cutters, that I have recently bought in Hong Kong, but if you use your imagination the possibilities are endless. Now all I need is for someone to have a baby boy, so I can make a blue version… I can not wait!

Happy baking everyone!

(*If you live in the Amsterdam area and you would like some help making these baby-shower cupcakes please feel free to contact me for a workshop)

Oestour April 2013 – The oyster hunt (part two)

Oysters, Oysters

Oysters, oysters

and more oysters

and more oysters

After we returned from the oyster hunt with bucketloads (literally) of oysters, we were ready for the second part of the Oestour:  The oyster feast.

First we were welcomed into the lovely sunny garden of the same cafe we had started that morning, and were given a well-deserved cold drink after our hard work. Once we were all settled, Marcel started explaining to us how we should open an oyster without injuring ourselves. A very vital part of the oyster hunting process in my opinion, because if you do not know what you are doing and just randomly start poking a sharp knife into an oyster, there is a high chance you will be heading straight to the nearest emergency room. However if you follow the following precautionary measures and take some time to practice, you should be fine. This is how it should be done:

Step 1:  Put on a glove and take a folded dishtowel into the same hand. The dishtowel provides some extra protection and also helps to secure a firm grip on the oyster.

Step 2:  Place the oyster in your hand with the flat side up and the hinge (pointy part of the oyster) facing towards you. If you are a lefty you should also have the flat side up, but the round part of the oyster facing towards you instead.

Step 3:  For the actual opening of the oyster you can choose between two methods:

Side-entry method: Insert your oyster-knife in the upper right hand corner of the oyster, at 2 o’clock (8 o’clock if you are a lefty), at the point were the two halves of the shells meet. This is were you can find the adductor muscle of the oyster (the muscle responsible for opening and closing the oyster). Once you have inserted your knife at this point, gently push it further into the oyster and start sliding the knife back and forth until the top shell gives a little. Keep the blade of knife pressed against the upper shell while you do this, to avoid cutting into the oyster meat. Once the oyster is cut loose you can twist your knife sideways to open the shell completely.

Hinge-entry method: Insert the knife into the point were the two shells join together (the hinge) then gently wiggle it in until you feel that you are inside the oyster. Then open the oyster by sliding the knife to the ‘ 2 o’clock point ‘ and cut the adductor muscle loose. Make sure you keep the knife pressed against the upper shell so that you do not cut into the oyster meat while you do this. Once the top shell gives a little, twist your knife sideways and open the oyster.

Step 4: Once you have chucked away the top shell, you can cut the bottom part of the adductor muscle which attaches the oyster to the bottom of its shell. Once the oyster is loose, you are good to go!

How to open an oyster properly?

How to open an oyster properly?

Besides the two above mentioned methods we also learned that there is an alternative method which I would like to call the ‘lazy method’: Also known as the barbecue!

If the oysters are too big to open without cracking the shell in half, or they are just stubborn and refuse to open for no particular reason, you can still eat them if you place them on the barbecue for 3-5 minutes (depending on their size). With this method the oysters will cook in their own fluid and open themselves when they are done. Besides the fact that this method requires no knife-effort and is therefore by far the safest option, it is also very delicious.
Apart from the closed oysters, we also prepared some opened oysters on the barbecue.

Barbecued oysters

Barbecued oysters

green herb crusted oyster

Grilled breadcrumb oyster

Garlic butter oyster with salad

Garlic butter oyster with salad

The people from the Oestour also prepared a couple delicious salads, different sorts of bread and a variety of toppings/dressings so that we could try different flavor combinations. This was great, because no matter how much you like raw oysters, after eating 5- 10 oysters your taste buds are ready for something else.
We could choose between a delicious herbed breadcrumb-topping, garlic butter and a classic French shallot and a red-wine vinegar dressing (called mignonette in French). They had also made a dressing with soy sauce, a combination I had never tried before, but which was surprisingly tasty. Some people put the soy sauce dressing on their barbecued oyster but I personally liked it more on a raw oyster. Below you can find the recipe:

soy-sauce dressing

soy sauce dressing

Soy sauce dressing for oysters

  • 2 shallots finely chopped
  • 1/2 red pepper diced
  • 2 cloves of finely chopped garlic
  • 2 tablespoons of soy sauce
  • 2 tablespoons of olive oil
  • 2 tablespoons white wine vinegar

About two hours into the feast, after we had eaten more oysters than we could possibly count, had more than a few glasses of wine and beer and we were all perfectly happy sitting in the sun, something really special happened.
Just when we thought the day could not get any better, Alex (my boyfriend) found a pearl!
Because I had organised the day (and I can vaguely remember letting out a scream for him to give it to me, oops) he gave the pearl to me! The perfect ending to the perfect day!

A real pearl!

A real pearl!

After some research I found out that is very rare for a pearl to be found in a wild oyster. It is estimated that only 1 in 35.000 wild oysters contains a pearl. An oyster makes a pearl when a little piece of dirt (sand grain, seaweed, wood particle) gets stuck inside the oyster while it is sucking in water to filter out the plankton that it lives on. Sometimes the oyster is unable to get rid of this little pice of dirt and because this irritates the oyster it begins to form layers of the inner shell (mother of pearl) around the dirt to make it smoother. Apparently it takes about 200 layers to make a pearl with a 1 mm width! It must have taken many years to grow into the size of the pearl we found, which makes it such a special and lucky find! My plan is to make it into a hanger for a necklace, when its done I promise I will post a picture.

I can imagine that some of you would also like to go on the Oestour.
Your first chance to hunt for your own oysters and to find a pearl (not guaranteed) will be in September of this year.
Please visit the website if you want to order your tickets for next season:  http://oestour.marcelschouwenaar.nl/

Oestour April 2013 – The oyster hunt (part one)

DSC_0140
When I suggested to go on an oyster excursion, my oyster-loving friends met the idea with both enthusiasm and curiosity. Through the years we had all become very experienced in ordering and eating oysters, but as we would soon find out, none of us ‘city-slickers’ knew exactly how they made it from the water to our plates, let alone what this process was called. Does one pick oysters, harvest them, dig them out?  No one knew for sure, but it did not take us long to agree that we liked the thought of going hunting for oysters the most.

On a very early and sunny sunday morning in April, 14 people and a dog, left Amsterdam to go on our first-ever Oyster hunt!

A good two hours later we arrived at cafe ‘Het loze vissertje’ in Wilhelminadorp, on a bay of the Oosterschelde (Zeeland). Here we were greeted by Marcel Schouwenaar who is the mastermind behind the Oestour and we were kindly offered a coffee and a Zeeuwse Bolus (a sweet, sugar and cinnamon, pastry typical for this part of the Netherlands) so that we would not have to eat our first oyster on an empty stomach.

Zeeuwse Bolussen

Zeeuwse Bolussen

Because the tide does not wait, not even for oyster-hunters, the time soon came to head out towards the water.
Armed with buckets, chisels, screwdrivers, wellingtons and gloves, we climbed up the dyke, where Marcel started the tour by giving us a short oyster-introduction. When he had shared his knowledge about the history of the wild oyster and provided us with some practical tips about which oysters to look for, we were all very eager to head out to the oyster-beds and begin the hunt.

our group on the dyke

Crash course into the wonderful world of the wild oyster

We were told to search for relatively small oysters, the size that would fit into a big hand palm. Farmed oysters are usually quite small because they are harvested for consumption after a 2-4 years. These wild oysters on the other hand can become very old (15-20 years) which results in gargantuan oysters. Because wild oysters have more time to grow, they can become as long as 25 cm! Besides the fact that these big oysters have too much meat in them to swallow in one go, they are also very hard to open without breaking the shell.

Wild oysters do not grow in neat little rows, but rather in giant clumps on top of each other. Because these oysters have razor-sharp edges, Marcel advised us to look for loose oysters and leave the big clumps alone. The reason for this is that, even with big gloves on, you could seriously injure yourself by attempting to separate one single oyster from its clump of sibblings.

Oyster hunting

Oyster hunting

Oysters in bucket

Oysters in a bucket

Big clump of oysters

Big clump of oysters

The foreign Japanese oyster (also known as the Creuse) was introduced to the Netherlands after an outbreak of the ‘oyster-disease’, killed most native Dutch oysters in the 1960s. This oyster species proved to be very resilient and has flourished ever since its introduction up to the point that ecologists now even speak of an ‘oyster-plague’. Good for us! Because of the abundance of oysters in the Dutch waters, the government wants to promote their consumption and has ruled that every person is allowed to bring home up to 10 kg of wild oysters a day!

The Dutch oyster-season usually starts in September and goes on until April (all the months with the R in their names). During the other months, oysters can still be eaten, but because they spawn (process where they release eggs and sperm into the water to produce offspring) during this time, they become soft, watery and less meaty. All in all enough reason to leave them alone for a couple of months if you ask me.

When after an hour or so, everyone had their buckets filled up to the rim with oysters, we were ready for the next step. Because oysters grow in the mud we had to give them a good rinse until the water became clear instead of murky.

Oyster heaven

Oyster heaven

Besides oysters we also found a lot of other sea creatures, like mussels, starfish (seastars), regular crabs and even a few hermit crabs. The crabs we found were unfortunately way too small to eat, so we put them back so that they would get the chance to grow a little bigger.

When we were all done rinsing our oysters and had worked up an appetite, Marcel invited us all back to the cafe we met earlier that morning for the second part of the excursion: The oyster feast!

If you want to know how to open an oyster and learn about different ways to eat them, please make sure to revisit my blog!

The oyster hunt (part two) will soon be posted…

A little starfish

A small starfish

A Crab

Crawly Crab

Rinsing the oysters

Rinsing the oysters

Full buckets for everyone

Happy hunters: Full buckets for everyone