Summer time risotto – with balcony grown broad beans

DSC_0395_2Back in april, when it was still way too cold outside, I planted a broad bean in a bit of soil and put it in my window sill to grow. The seed, that was given to me at a food festival, was taped to a little piece of paper that stated that this single bean would one day become a big plant if only it was planted…

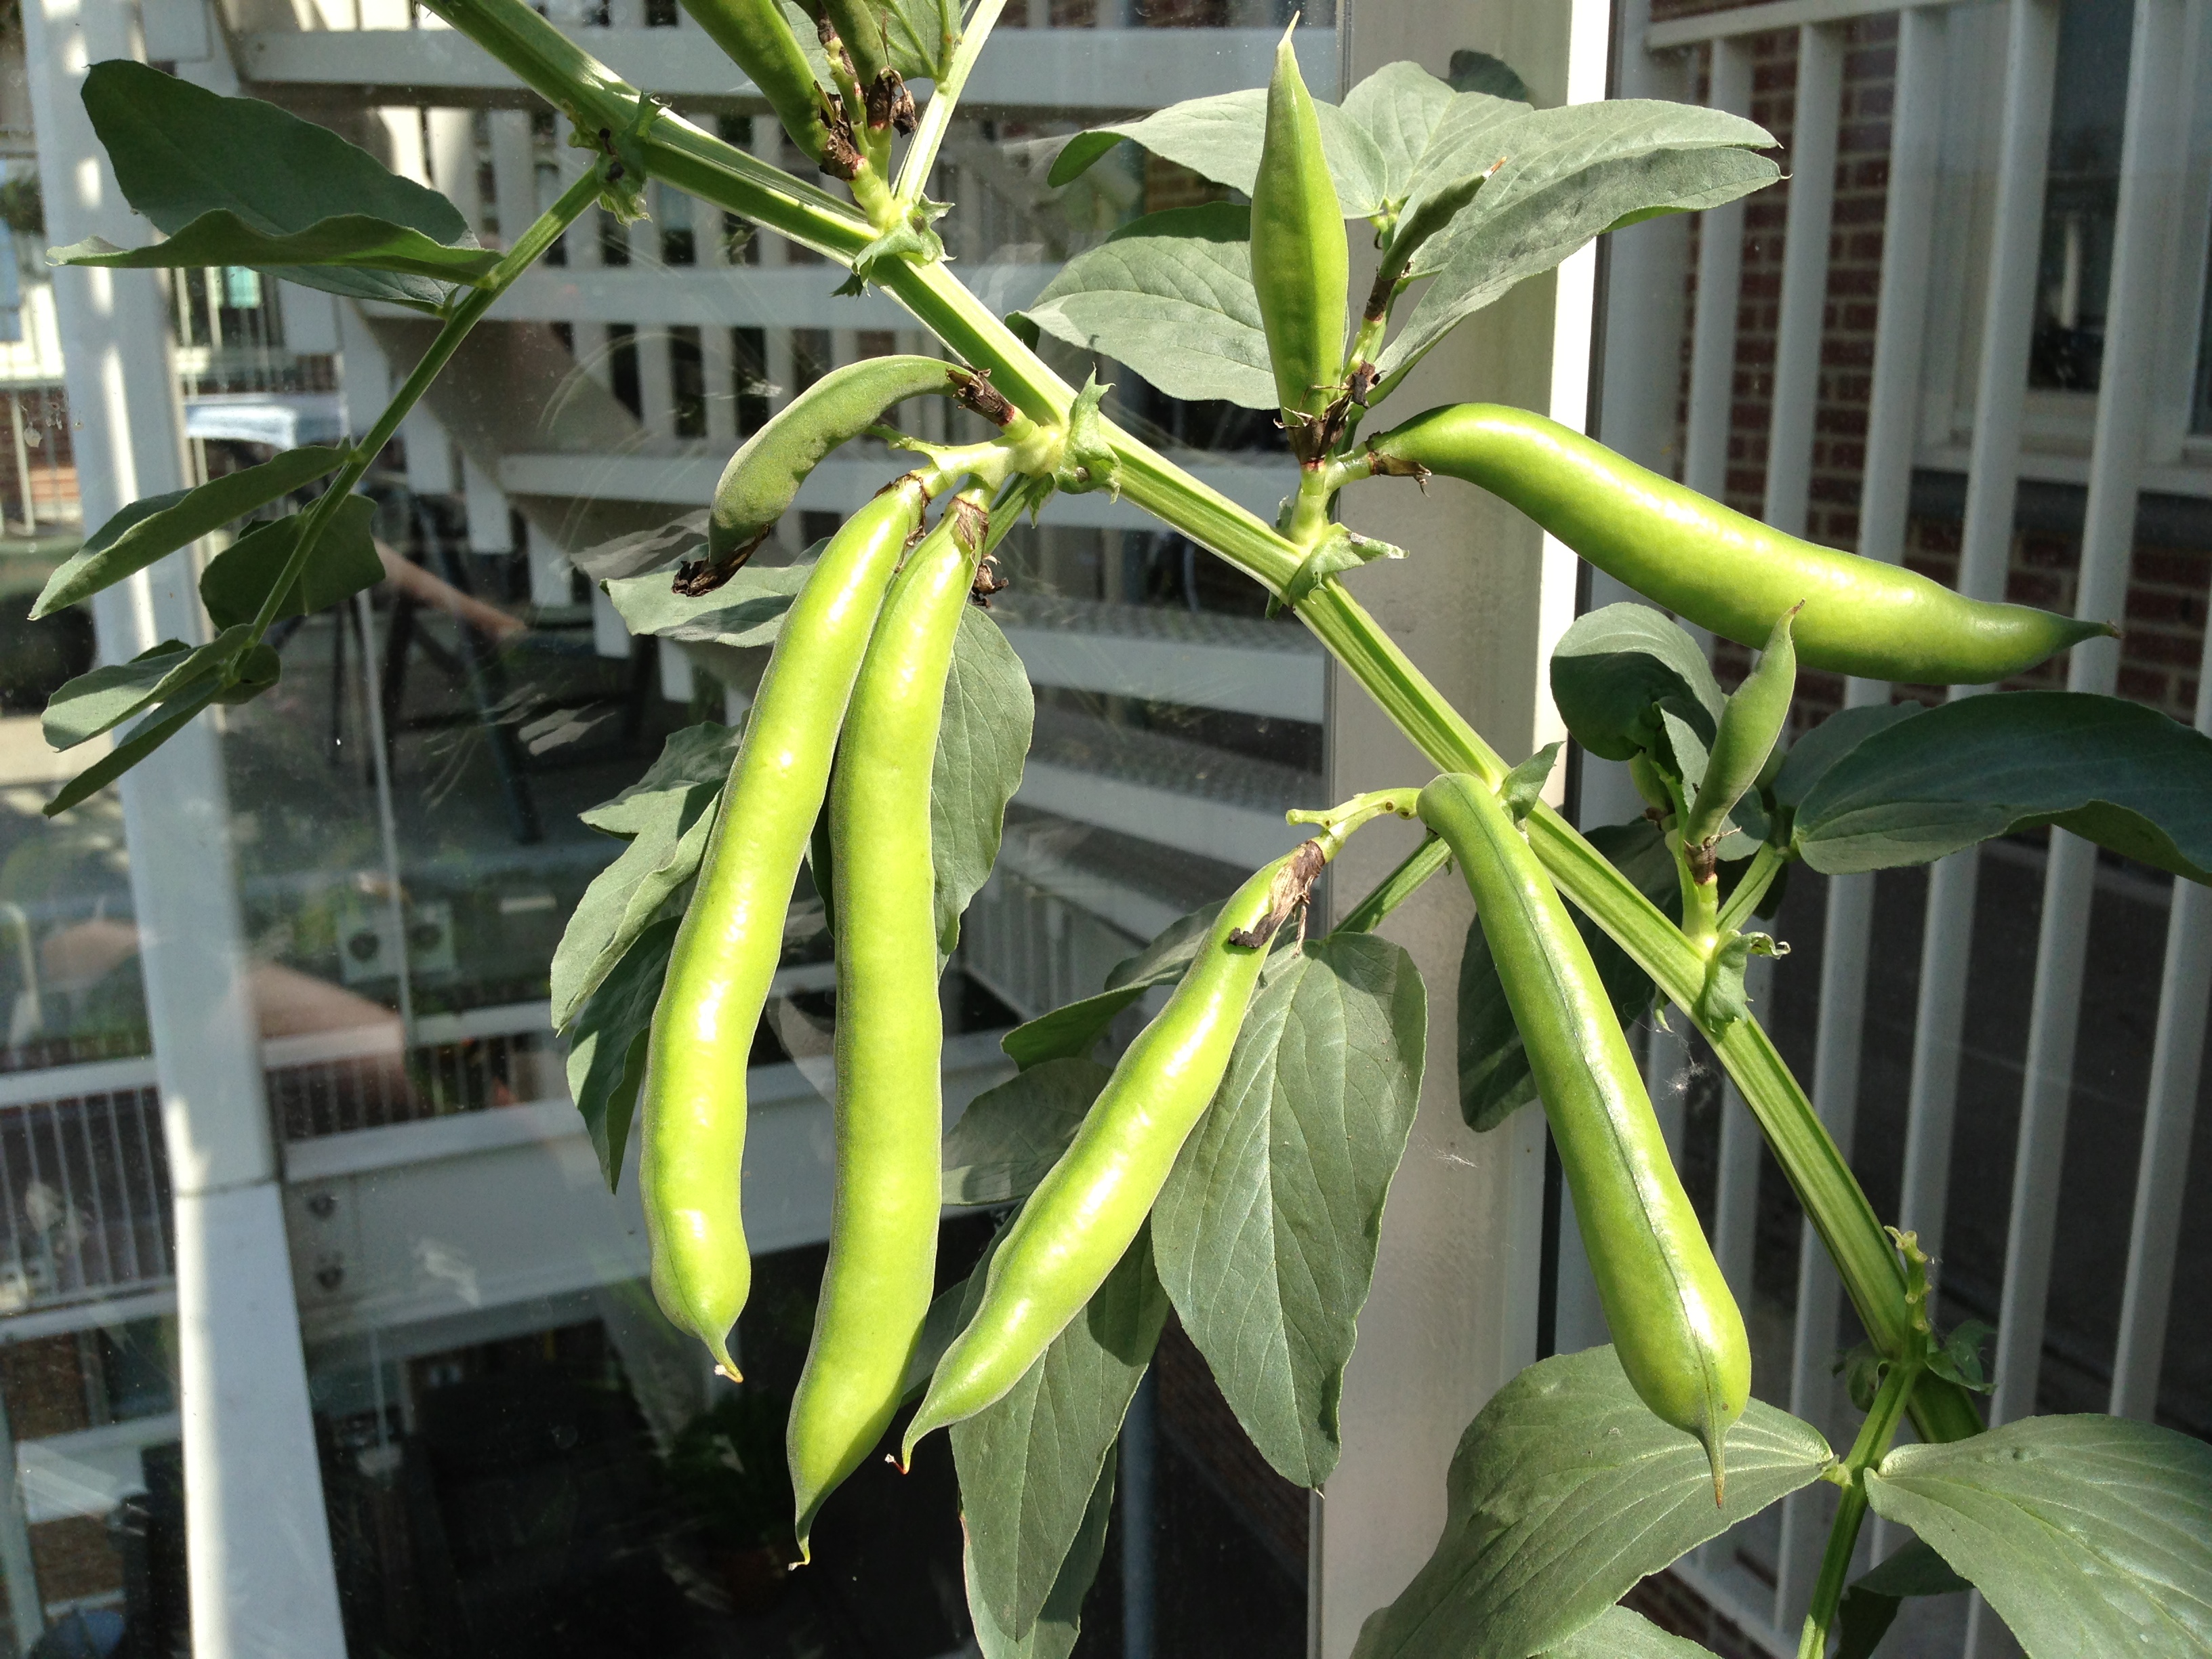
With some proper TLC from my side, the broad bean delivered on its promise and within a week or so grew into a tiny plant. I have grown many different plants from seeds, but this was definitely the most spectacular growing process I ever witnessed. When I transferred the small plant into a bigger pot and put it on my balcony, it grew taller and taller until it was an impressive 1.5 meters high and began to form beautiful flowers. The yellowish/black flowers were not only pretty but also proved to be a big hit with the neighborhood bees! When the flowers eventually turned into fat velvety pods, the time had finally come to start thinking of a recipe that would do them justice.

broadbean1

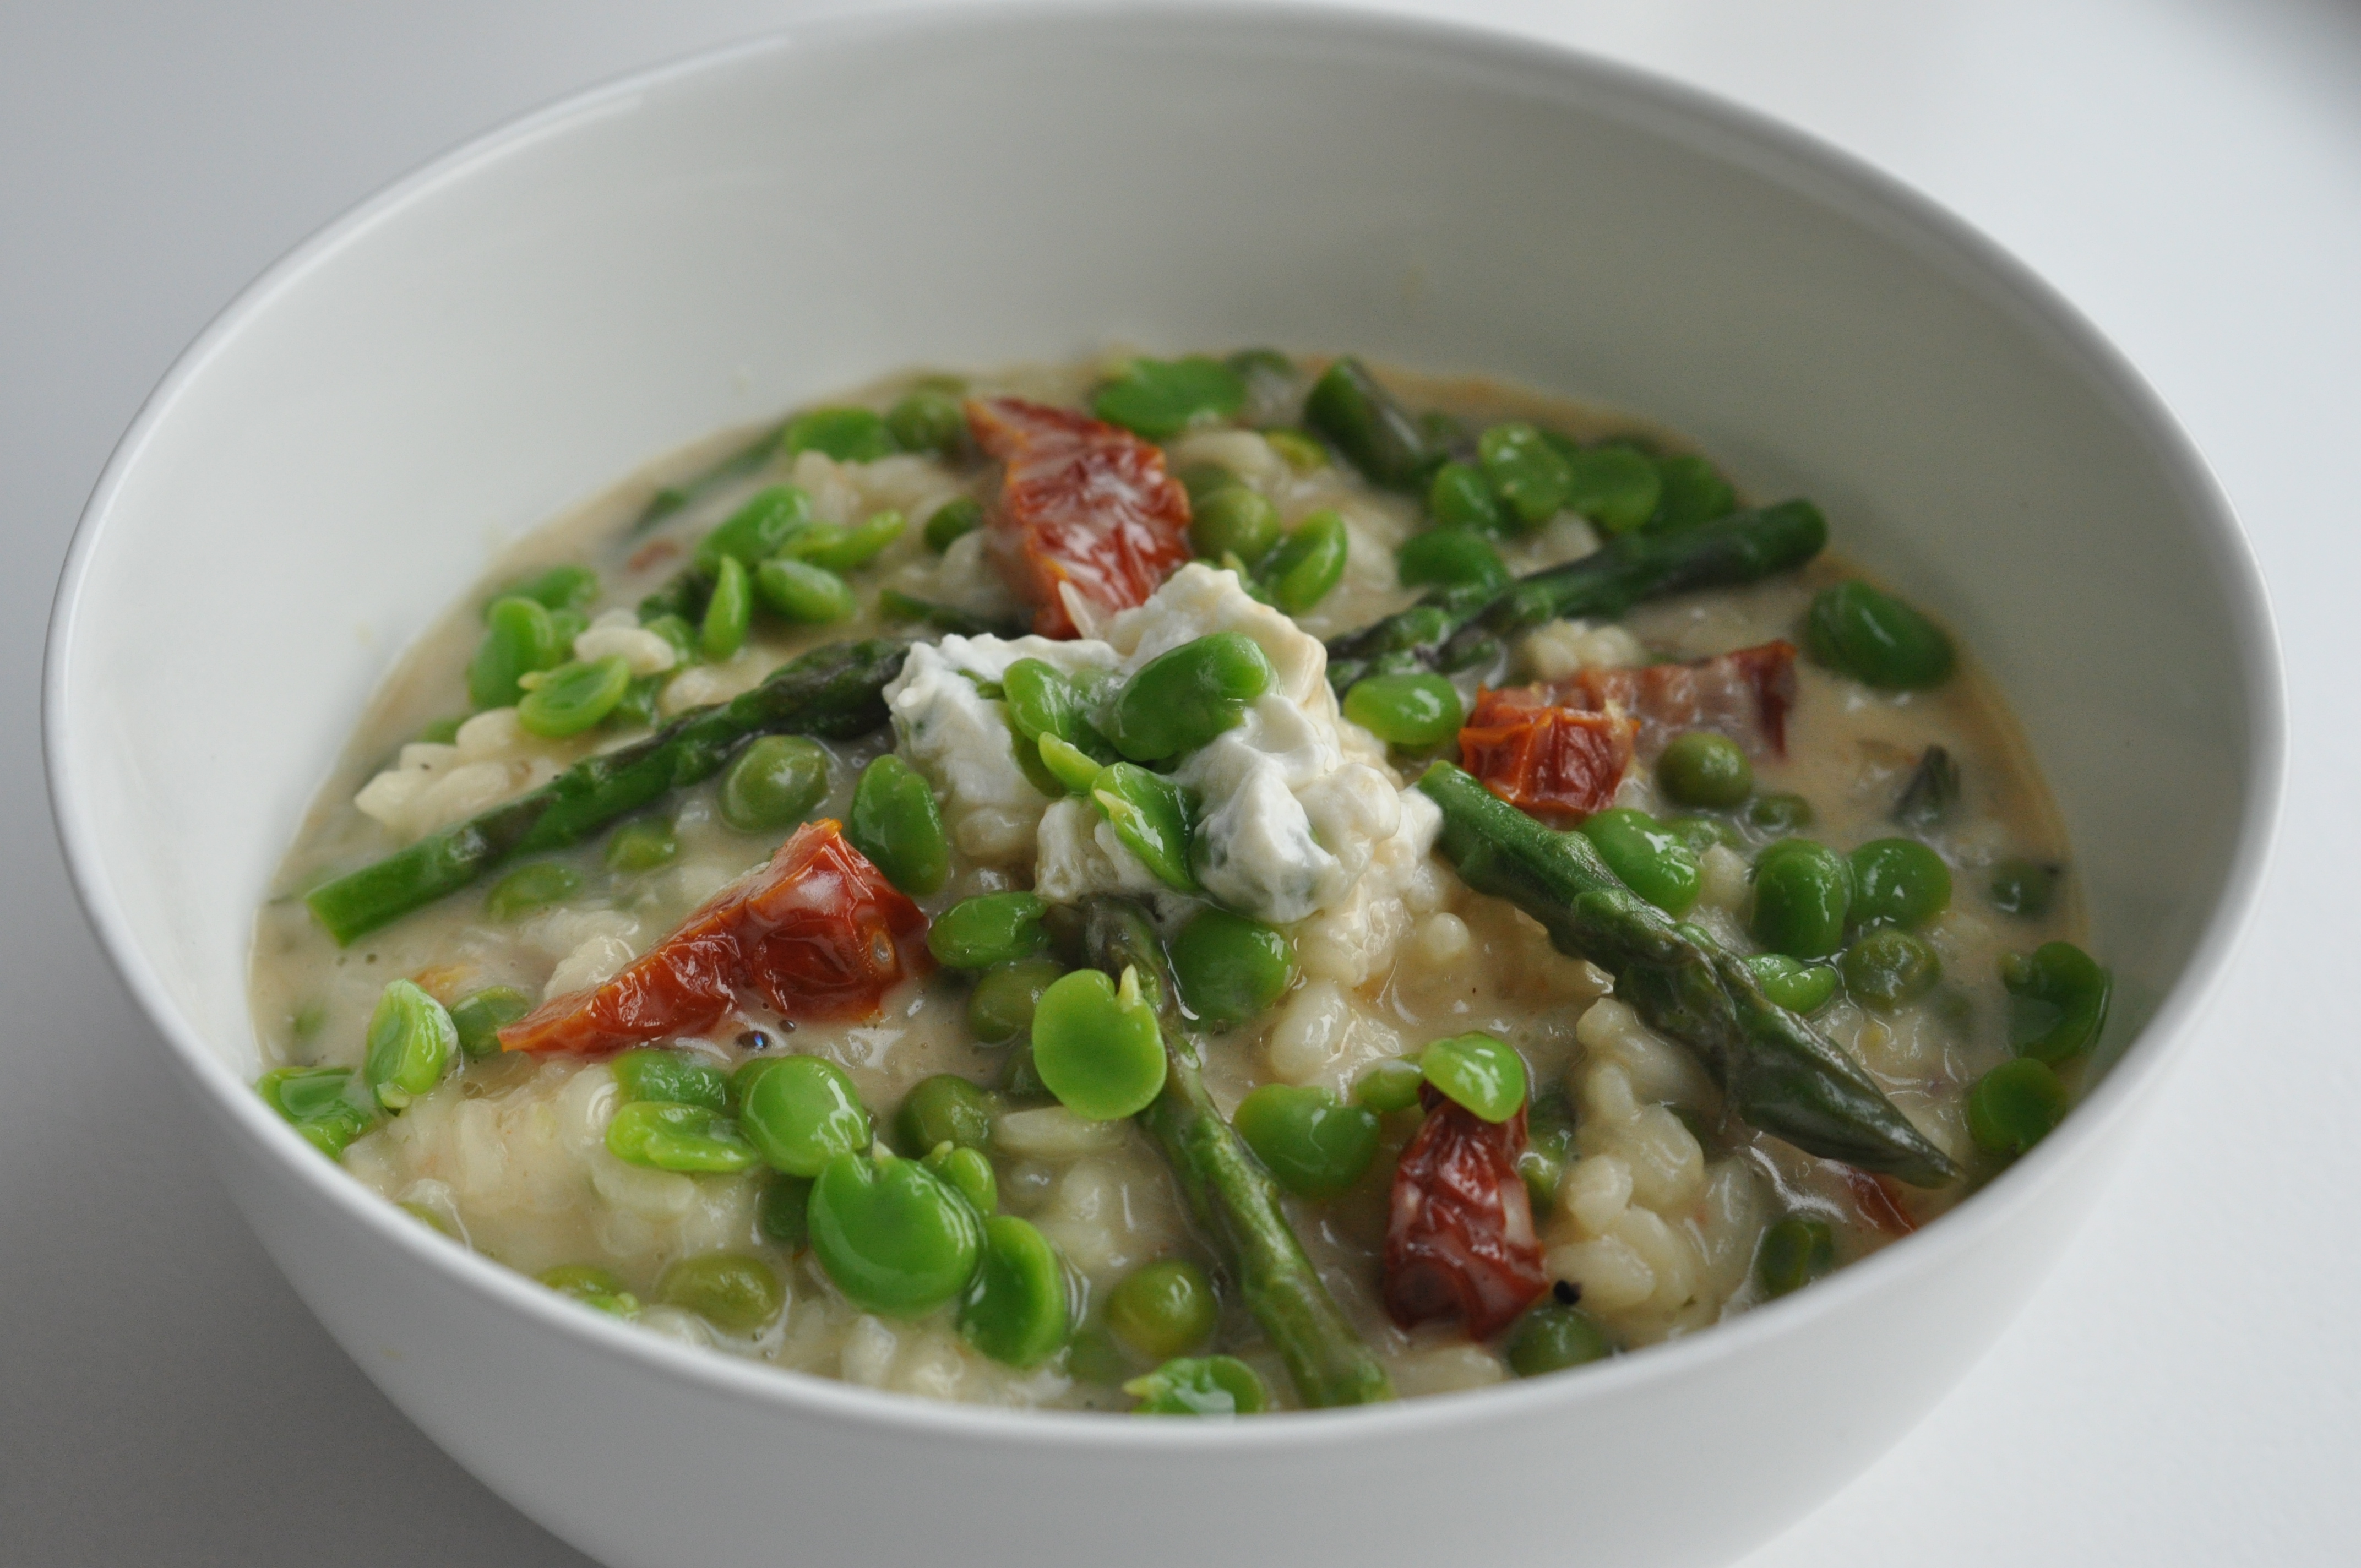
The first thing that came to my mind was to make a light vegetarian summer risotto. Although the word light should probably not be used in the same sentence as risotto, I do think I am allowed this time. My recipe does not call for butter, and because this is usually a mandatory part of any risotto recipe, I believe this recipe can pass as light. Do not worry, there is still enough cheese in it to make it nice and creamy. I feel confident enough to promise you that you will not even miss the butter!

Although my plant produced a decent amount of broad beans, it was unfortunately not enough for a full pot of risotto. That is why I also bought some nice fresh peas. I actually like this because the sweet pies help balancing out the slight bitterness of the broad beans.

When you use fresh broad beans for this dish, I would advice you to double pod them so you can see their lovely bright green color. If the term ‘double podding’ is new to you, or you do not yet know how to do it, the step by step tutorial below will break it down for you.

http://www.waitrose.com/home/recipes/step_by_step/how_to_double_pod_broad_beans.html

I think the meatiness of the dried tomatoes gives the risotto a nice bit of extra flavor and texture, but I have to warn you that they are very strong in flavor. If you do not like this you can easily leave them out or replace the dried tomatoes for something else.

Summer time risotto recipe: Cooking time 20 minutes.

Serves 2/3 people as a main course or 4 people as a starter.

  • 2 table spoons of olive oil
  • 700 ml vegetable/chicken stock
  • A glass of white wine/sherry
  • 2 small shallots/onion finely chopped
  • 200 gram risotto rice (Arborio)
  • 200 gram fresh broad beans/peas or a mix of the two (frozen is also an option)
  • 40 gram (small hand full) dried tomatoes sliced into thin strips
  • 125 gram asparagus tips
  • 100 gram fresh soft goatscheese
  • 100 gram grated parmezan cheese

Heat the oil in a heavy-based pan and soften the chopped shallots for one minute. Now add the rice and keep stirring for 3 more minutes until the rice becomes translucent. Make sure that the heat is not on too high and the onion and the rice do not brown.

To get risotto rice perfectly ‘al dente’ it needs to boil for approximately 16 minutes. After the rice has become translucent you can start by first adding the wine and then a ladle of stock to the rice and let it cook, gently stirring from the center to the side. Turn up the heat a little if necessary. Continue adding the stock, ladle by ladle, while stirring, allowing the rice to cook and the stock to be absorbed each time. After about 6 minutes add the dried tomatoes so they get some time to absorb the stock and to become a bit softer. Meanwhile just keep stirring and adding stock. After 5 more minutes add the broad beans and peas and keep stirring for the last 5 minutes.

In order to prevent the fragile asparagus tips from breaking while stirring,  you can blanche/cook them separately and add them at the last minute. If you are using regular chopped up green asparagus you can add them at the same time as the broad beans/peas.

When the risotto is ‘al dente’, which means that there is still a slight crunchiness in the middle of the rice, you can take the risotto of the heat. Always make sure that you taste the risotto first. Cooking is no exact science and it can happen that it needs a minute or two more. If this is the case do not panic and just add a little bit more stock and keep stirring.

Now add the asparagus tips, the goats cheese and the parmesan cheese and stir for 1-2 more minutes until the risotto becomes nice and creamy and is ready to serve.

Serve the risotto immediately and enjoy!

Advertisement

Rhubarb pie – Let’s celebrate summer!

DSC_0388You might have noticed that it is rhubarb time again. The last few weeks I came across the long reddish stalks of the rhubarb plant at nearly every market, vegetable store and even at most grocery stores.

Noticing them is one thing, but what should you do with them?

Strictly speaking, rhubarb is a vegetable and not a fruit, but nevertheless it is mostly used in desserts and pies. Rhubarb is at its best from late spring to early summer, so right about now would be the best time to cook with it. The easiest way to cook rhubarb is to boil the pieces of rhubarb together with a lot of sugar in a little bit of water until the stalks have separated into threads. Once the mixture has cooled you can add a couple spoons to some ice-cream or yoghurt. This easy cooking method is both delicious and quick, but also a bit too boring for a blogpost in my opinion. What else can we cook using rhubarb?

Did you know that John Cleese (Monty Python) once dedicated a whole song to the rhubarb pie called: “who wants another slice of the rhubarb tart?”

Although I would not go as far as Mr. Cleese in claiming that “eternal happiness is rhubarb tart”, I do think it comes pretty close. This rhubarb pie is one of my favorite pies because it reminds me of warm summer days in my parents garden. The beautiful balance between the tartness of the rhubarb and the sweetness of the custard makes this the perfect summer pie. All the credits for this pie must go to my mother since this is her recipe.

SHOPPING TIP: When you buy rhubarb, just make sure the stalks are nice and firm. If the stalks are bendy that means the stalks have already lost a lot of their water which makes them chewy.

This recipe is for a 30cm Ø pie
Start by preheating your oven to 190 degrees Celsius.

For the pastry:

300 grams all-purpose flour
2 teaspoons of ginger powder
2 table spoons of sugar
125 grams of butter
3 tablespoons cold water

Put all the ingredients in your food processor until everything is mixed together. With your hands form a ball of the dough, wrap into some cling foil and put in the refrigerator for at least 1/2 hour. Then roll out the dough thinly with a roling pin, or by using the ball of your hand. Cover the pie- crust with baking paper and (ceramic) baking beans.

DSC_0382

DSC_0383


Blind bake the pie- crust for 10 min and take out of the oven to cool.
Cut the rhubarb into small pieces and lay them into the pie crust.
Now you can start making the filling.

For the filling:

350-400 grams rhubarb (cut into small pieces)
2 small eggs (1 1/2 large)
225 grams of sugar
The zest of 1 organic orange
2 tablespoons of flour
1.5 dl of freshly squeezed orange juice
1.5 dl milk

DSC_0384
In your food processor mix together the eggs, sugar, orange zest and two table spoons of flour.
Put the orange juice and the milk in a pan and bring to the boil. When the liquid is boiling add to the mixture in the food processor and mix it one more time. Gently pour the mixture over the rhubarb. Put in the oven for 30 min.
Let the pie cool before you remove it from its pan to prevent the crust from cracking.

Serve like this or with some (yoghurt) ice-cream and may the summer last forever!

Home made granola – A healthy way to start your day

DSC_0348

Are you the type of person that starts the day with a bowl of cereal?
I recently learned through a random newspaper article that cereals still remain the number one breakfast-choice for people in the Western world. I have never been one of those people and it made me wonder why?
After some thinking I came up with the following 3 reasons:

1. Most cereals taste artificial and seem very unhealthy to me. When I looked up the facts, I learned that my initial hunch was right. The overall majority of breakfast cereal, in their attractive colorful boxes, have little to no nutritional value and to make things worse, they are packed with sugar (sometimes as much as 40%). This is not only true for all children’s cereal, like Coco puffs and Kellog’s Frosties, but also for most common brand granola’s. Nobody thinks sugary (chocolate) biscuits make a healthy and nutritious breakfast right, so why would you eat these cereals?

2. On the other side of the cereal-spectrum you have (organic) muesli with nuts and dried fruit. Although this is actually a healthy breakfast option, full of fibers, vitamins and minerals, it unfortunately also tastes way too healthy to me. Do not get me wrong here, because I fully support choosing the healthiest option available, but I do have my limits. Whenever I eat muesli, I can not help but think that I am eating something that should have been fed to cattle instead…

3. Somewhere in the middle of all of this you can find organic granola. I prefer granola over muesli because it has a nice crunch to it and it is usually a bit sweeter. Because most organic granola’s are sweetened with honey instead of sugar or (corn)syrup it also makes them a slightly healthier option. Whenever I do eat granola, I always feel like the ratio between oats and the good stuff (nuts, seeds,raisins etc.) is off. Surely I understand that ‘the good stuff’ is what makes the granola expensive, but I would not mind paying a little more if that meant it also tasted better…

After all this thinking, my findings soon led me to believe there was a solution to my problems:
I should make my own granola, exactly the way I would like to eat it!
Is it really worth going through all that trouble you might ask?  I believe the answer to that question is simple:
responsibly made granola is not only very tasty but also a good addition to a healthy diet. Granola contains fibers which are important for digestion and will make you feel full for longer. That way you won’t start craving (unhealthy) snacks early in the day before lunch. The oats, seeds and fruits in the granola are full of antioxidants, vitamins and minerals that we need in order to stay healthy. On top of the health argument it is also very easy and surprisingly fun thing to do (also with little kids!) Are you convinced?

This is how to make your own home made granola:

When I decdied to make my own healthy granola, I did not cut corners and went for only organic ingredients. I will warn you in advance that it is not cheap to buy 8-10 different kinds of oats, nuts and seeds, but my guess is that you can make at least 6-8 kilo’s of granola with the ingredients that I got, so I think it is worth it.

Please note that you can use any oats, seeds, dried fruit that you like (cranberries, abricots etc.)
You can even add dark chocolate to your granola as long as you remember to add it after baking.

My recipe makes about 1 kg of granola.

Preheat your oven to 150 degrees Celsius and line a baking tray with baking paper.

Dry ingredients:

250 grams raw rolled oats (high in fibers, complex carbohydrates and protein)
250 grams raw buckwheat (high in fibres, Vitamins B1 and B6 and minerals such as magnesium)
75 grams broken flaxseed (full of nutrients, omega-3 fatty acids, antioxidants, minerals and vitamin E)
– 1 cup of chopped almonds (a good source of vitamin E and B-complex and has cholesterol-lowering properties)
– 1 cup of shredded coconut (high in fibres and a good source of B-complex vitamins)
– 1 cup of white mulberries (high in vitamin C, iron and several anti-oxidants that boost the immune system)
– 1 cup of pumpkin seeds (high in zinc, manganese, magnesium and vitamin E)
– 1 cup of raisins (a good source of energy, resveratrol, electrolytes and minerals)
– 1 cup of chia seeds (not on the picture) (high in fibers, omega 3 and calcium)
– zest of 1 organic orange (high in Vitamin C and essential minerals like calcium, magnesium and zinc)

Wet ingredients:

– 4 tablespoons vegetable oil (I used coconut oil which is great because it has no odor or flavor,but you do need to heat it first to make it become liquid. You can also use groundnut oil or another type of vegetable oil that can be heated)
– 8 tablespoons (organic) honey

granolalast

Start by mixing all the dry ingredients together in a big bowl. Then gradually add the coconut oil and the honey to the mixture and stir until all the grains are covered with the liquid. You might think that the mixture still seems very dry, but this is how it should look. Now pour the mixture on a baking tray and spread it out (because I have a large oven I managed to get everything on one baking tray, if you have a smaller oven you might want to split the mixture in half and repeat this process twice). Press the mixture together with the back of a spoon and put the tray in the oven for 25-35 minutes. Stir the mixture every 5-10 minutes to make sure that the oats bake evenly. When the oats turn golden brown and you begin to smell that something is baking, you take the tray out of the oven and let it cool. Do not touch the mixture before it is cooled completely and it has set. When it is cooled you can break the granola in to chuncks/pieces and store it in an airtight container or mason jar.

Now you have made yourself a delicious and nutritious breakfast! Just add some seasonal fruit to your bowl each morning and some (soy)milk or yoghurt and you can be sure that you have started your day in a healthy way.

Please let me know what ingredients you come up with to put in your favorite granola, the possibilities are endless!

It’s a girl! – Baby shower cupcakes

cupcakes two white

Ever since I was very young, I have been a huge fan of baking. I enjoy baking all sorts of cakes, pies and cookies, but the last few years I have been really into making cupcakes.  Although the rise in popularity of the cupcake seems to be declining again, I do not believe that the cupcake craze is totaly over and I doubt it ever will. For me, cupcakes are still the perfect party treat. Somehow these little cakes with their delicious and colorful frosting posses the power to make any party feel extra festive. Having one (or two) pretty cupcake(s) all to yourself just make you feel very special and spoiled, don’t you agree?

When I was recently asked to bake a cake for the baby-shower of my good friends, Aisha and Gijs, it did not take me long to decide that I would be making baby-themed cupcakes. Because they are expecting a little girl, I knew pink would have to be my color.

I have made many different cupcakes over the years and my starting point for recipes has always been: http://www.joyofbaking.com This American website provides every baking and dessert recipe you can possible think of and offers clear and elaborate descriptions and videos. For this special baking-occasion I decided to make red velvet and lemon-vanilla cupcakes, but not before I stocked up on all the pink things I could possibly find.

cupcakes white

Although the taste and texture of the red velvet cupcakes was good, I felt like they could have risen a little bit more. Another thing I did not like about this recipe was that instead of making the promised 24, I only managed to squeeze out 15 out of the batter. I have made red velvet cakes before, but I have yet to find the perfect recipe. However I will not give up my search because red velvet is one of my all time favorite flavors. So, if you have the perfect recipe please let me know!

The recipe for these delicious lemon-vanilla cupcakes on the other hand is a definite no-fail. I have made these several times now and I promise you that, if you stick to the recipe below, they will come out perfect. The original recipe does not call for lemon zest nor the seeds of a vanilla pod, but I think it makes the cupcakes taste a lot more special and interesting than an ordinary vanilla cupcake.

Before you start baking I have one big recommendation; as opposed to cooking, there is absolutely no room for guesstimating when it comes to measuring ingredients for baking. Because few things are worse for moral than a failed baking-experiment, I suggest you regard this purchase as a vital investment for your mental well-being. Digital kitchen scales only cost about 15-20 euros nowadays and they make a big difference in your baking results.

How to make lemon-vanilla cupcakes:

– 195 grams all purpose flour
– 200 grams granulated white sugar
– 1 1/2 teaspoons of baking powder
– 1/4 teaspoon of salt
– 113 grams of unsalted butter at room temperature cut into small pieces
– 2 large eggs
– 1 teaspoon pure vanilla extract
– the seeds of 1 vanilla pod
– the zest of 1 organic lemon
– 120 ml of plain yoghurt

Preheat the oven to 180 degrees Celcius and line 12 muffin cups with paper liners.

In the bowl of your electric mixer beat the flour, sugar, baking powder, and salt until combined. Add the butter, eggs, vanilla extract, and yogurt. Now beat the wet and dry ingredients together, at medium speed, until the batter is smooth and satiny, about 30 – 60 seconds. Scrape down the sides of the bowl and give it one more mix to make sure all the ingredients are combined properly.

Evenly fill the muffin cups with the batter. I prefer to use an ice-scream scoop so that all the batter actually ends up in the paper liners. This scooping-method also ensures that you end up with cupcakes of approximately the same size. Bake for about 20 – 25 minutes or until lightly browned and a toothpick inserted into a cupcake comes out clean. I always like to cook my cupcakes as short as possible to ensure that they stay nice and moist inside. There is nothing worse than a dry (cup)cake. Once they are done, remove them from the oven and place them on a wire rack to cool.

How to make cream cheese & whipped cream frosting:

– 227 grams of cream cheese (make sure you get plain cream cheese without onion and chives)
– 1/2 teaspoon pure vanilla extract
– 60 grams confectioners’ (icing or powdered) sugar
– 160 ml cold heavy whipping cream (double cream)
– a few drops of pink food coloring

First beat the double cream to peaks. Beat the cream cheese in the bowl of your electric mixer until smooth. Add the vanilla and confectioners sugar and beat until smooth. Gradually add the heavy cream and whip until the frosting is thick enough to pipe. Add more sugar or cream as needed to get the right consistency. For the last step, add the food coloring one drop at a time. You really only need a few drops to get the right color. Place the frosting back in the refrigerator for at least 30 minutes to an hour to make sure it is really cold before you start piping.

For the piping you will need a piping bag and a piping mouth. For these cupcakes I used a big size mouth but you can use whatever size or shape you think will look nice. If you do not own a piping bag, you can also use a spatula to cover the cupcakes, however this will not look as pretty. Piping does requires a little practice but once you master it, it is the most fun thing in the world! For making the cut-outs on top of the red velvet cupcakes I used rolled out pink fondant and baby-themed cookie cutters, that I have recently bought in Hong Kong, but if you use your imagination the possibilities are endless. Now all I need is for someone to have a baby boy, so I can make a blue version… I can not wait!

Happy baking everyone!

(*If you live in the Amsterdam area and you would like some help making these baby-shower cupcakes please feel free to contact me for a workshop)

Oestour April 2013 – The oyster hunt (part two)

Oysters, Oysters

Oysters, oysters

and more oysters

and more oysters

After we returned from the oyster hunt with bucketloads (literally) of oysters, we were ready for the second part of the Oestour:  The oyster feast.

First we were welcomed into the lovely sunny garden of the same cafe we had started that morning, and were given a well-deserved cold drink after our hard work. Once we were all settled, Marcel started explaining to us how we should open an oyster without injuring ourselves. A very vital part of the oyster hunting process in my opinion, because if you do not know what you are doing and just randomly start poking a sharp knife into an oyster, there is a high chance you will be heading straight to the nearest emergency room. However if you follow the following precautionary measures and take some time to practice, you should be fine. This is how it should be done:

Step 1:  Put on a glove and take a folded dishtowel into the same hand. The dishtowel provides some extra protection and also helps to secure a firm grip on the oyster.

Step 2:  Place the oyster in your hand with the flat side up and the hinge (pointy part of the oyster) facing towards you. If you are a lefty you should also have the flat side up, but the round part of the oyster facing towards you instead.

Step 3:  For the actual opening of the oyster you can choose between two methods:

Side-entry method: Insert your oyster-knife in the upper right hand corner of the oyster, at 2 o’clock (8 o’clock if you are a lefty), at the point were the two halves of the shells meet. This is were you can find the adductor muscle of the oyster (the muscle responsible for opening and closing the oyster). Once you have inserted your knife at this point, gently push it further into the oyster and start sliding the knife back and forth until the top shell gives a little. Keep the blade of knife pressed against the upper shell while you do this, to avoid cutting into the oyster meat. Once the oyster is cut loose you can twist your knife sideways to open the shell completely.

Hinge-entry method: Insert the knife into the point were the two shells join together (the hinge) then gently wiggle it in until you feel that you are inside the oyster. Then open the oyster by sliding the knife to the ‘ 2 o’clock point ‘ and cut the adductor muscle loose. Make sure you keep the knife pressed against the upper shell so that you do not cut into the oyster meat while you do this. Once the top shell gives a little, twist your knife sideways and open the oyster.

Step 4: Once you have chucked away the top shell, you can cut the bottom part of the adductor muscle which attaches the oyster to the bottom of its shell. Once the oyster is loose, you are good to go!

How to open an oyster properly?

How to open an oyster properly?

Besides the two above mentioned methods we also learned that there is an alternative method which I would like to call the ‘lazy method’: Also known as the barbecue!

If the oysters are too big to open without cracking the shell in half, or they are just stubborn and refuse to open for no particular reason, you can still eat them if you place them on the barbecue for 3-5 minutes (depending on their size). With this method the oysters will cook in their own fluid and open themselves when they are done. Besides the fact that this method requires no knife-effort and is therefore by far the safest option, it is also very delicious.
Apart from the closed oysters, we also prepared some opened oysters on the barbecue.

Barbecued oysters

Barbecued oysters

green herb crusted oyster

Grilled breadcrumb oyster

Garlic butter oyster with salad

Garlic butter oyster with salad

The people from the Oestour also prepared a couple delicious salads, different sorts of bread and a variety of toppings/dressings so that we could try different flavor combinations. This was great, because no matter how much you like raw oysters, after eating 5- 10 oysters your taste buds are ready for something else.
We could choose between a delicious herbed breadcrumb-topping, garlic butter and a classic French shallot and a red-wine vinegar dressing (called mignonette in French). They had also made a dressing with soy sauce, a combination I had never tried before, but which was surprisingly tasty. Some people put the soy sauce dressing on their barbecued oyster but I personally liked it more on a raw oyster. Below you can find the recipe:

soy-sauce dressing

soy sauce dressing

Soy sauce dressing for oysters

  • 2 shallots finely chopped
  • 1/2 red pepper diced
  • 2 cloves of finely chopped garlic
  • 2 tablespoons of soy sauce
  • 2 tablespoons of olive oil
  • 2 tablespoons white wine vinegar

About two hours into the feast, after we had eaten more oysters than we could possibly count, had more than a few glasses of wine and beer and we were all perfectly happy sitting in the sun, something really special happened.
Just when we thought the day could not get any better, Alex (my boyfriend) found a pearl!
Because I had organised the day (and I can vaguely remember letting out a scream for him to give it to me, oops) he gave the pearl to me! The perfect ending to the perfect day!

A real pearl!

A real pearl!

After some research I found out that is very rare for a pearl to be found in a wild oyster. It is estimated that only 1 in 35.000 wild oysters contains a pearl. An oyster makes a pearl when a little piece of dirt (sand grain, seaweed, wood particle) gets stuck inside the oyster while it is sucking in water to filter out the plankton that it lives on. Sometimes the oyster is unable to get rid of this little pice of dirt and because this irritates the oyster it begins to form layers of the inner shell (mother of pearl) around the dirt to make it smoother. Apparently it takes about 200 layers to make a pearl with a 1 mm width! It must have taken many years to grow into the size of the pearl we found, which makes it such a special and lucky find! My plan is to make it into a hanger for a necklace, when its done I promise I will post a picture.

I can imagine that some of you would also like to go on the Oestour.
Your first chance to hunt for your own oysters and to find a pearl (not guaranteed) will be in September of this year.
Please visit the website if you want to order your tickets for next season:  http://oestour.marcelschouwenaar.nl/

“I love cooking with wine. Sometimes I even put it in the food” (W.C. Fields 1880- 1946)

wijn

I hate to waste food. Before I take a trip to the grocery store, I always check my fridge first and use what is still in there as my starting point for the next dinner. By doing so, I do not only challenge myself to use my imagination and combine ingredients, but at the same time it also reduces the chance of having to throw out food because it has gone bad.
Sure enough I am not a saint and sometimes things do end up in the bin, but I really try to make a conscious effort to minimize my food waste.

Another thing I loathe to do is to poor the remainder of a good bottle of wine down the sink. Even though my friends and I enjoy a bottle (or two, three…) during our weekend dinners, it does occasionally happen that a bottle goes unfinished. If the consumed amount of alcohol did not prevent me from remembering to put the cork back in the bottle (which I have learned is essential to keeping wine taste nice) I like to label this bottle as cooking wine!
If I have more than half a bottle left and it is horrible and cold outside, I love to make a proper slow-cooked red wine beef stew. If I do not have the time, it is finally nice and sunny, or I have less than 1/3 of a bottle left, I prefer to make my version of a no fail, super easy, and very tasty meatball spaghetti dish.

I believe every person should have at least 5 dishes in his/her cooking repertoire that you can cook really well, but at the same time do not require much time and effort. That way you can never go wrong when friends come over for dinner and it gives you time to sit down and talk to your guests. If you have trouble getting to 5 or you have grown tired of your usual recipes, I highly recommend you add this recipe to your routine.

Making meatballs from scratch usually takes quite a bit of time and also leaves you with a set of dirty hands. I promise that this meatball recipe is not only super quick, but it also does not involve vigorous scrubbing of the hands.
The trick for instant meatballs in 3 easy steps:
1. Buy some good quality sausages
2. wet your hands with water (which prevents the meat from sticking to your hands)
3. Take a sausage and gently push a section of the meat out of the skin, into a bowl or straight into the pan. I usually manage to squeeze at least 5 or 6 balls out of one sausage.

Because this dish does not require many ingredients, I think it is essential to go for the best quality sausage, cherry tomatoes, black olives and parmesan cheese you can get. I personally also prefer to use fresh pasta, but if you can not get that it also works fine with any dried version.

Ingredients for 2 people (cooking time 15 minutes):

– 250 grams of Italian sausage (I like to use lamb-sausages, but veal or pork sausages will do fine as well)
– 1 shallot finely chopped
– 1 clove of garlic chopped
– 1 small can of concentrated tomato puree (70 grams)
– 1 tablespoon of chopped fresh thyme
– 1 tablespoon of chopped fresh rosemary
– 1 full glass of red wine (a little bit more does not hurt either)

– 20 Cherry tomatos (halved)
– 3 tablespoons of small sun-dried black olives (preferably in oil)

– A bunch op chopped basil
– 2 hands full of freshly grated parmesan cheese

– 250 grams of fresh spaghetti or tagliatelle

Start with putting a big pan with salted water on the stove and bring to the boil.
Then place a frying pan on a high heat and add the little meatballs that you have created by pushing the meat out of the sausage skin. You can add a little bit of olive oil to the pan, but most of the time the sausages contain enough fat to cook in their own grease. When the sausages are turning a little brown, add the chopped shallot and garlic to the pan and fry for two more minutes. When the meatballs are browned, add the tomato puree, the wine and the fresh herbs and give it a good stir. Let this bubble away for a couple minutes. Now add the halved cherry tomatoes and the sun-dried olives and let it simmer over a low heat for a couple more minutes. Season to taste with salt and pepper.

Now it is time to put the fresh pasta into the boiling water and cook according to the instructions on the package, usually this takes 3/4 minutes. (If you use dried pasta you should start cooking the pasta and the sauce at the same time)
If the sauce looks too thick, just add a bit of the boiling pasta-water to dilute the sauce.

Drain your pasta when it is all dente and poor it into a nice serving dish. Add the pasta sauce and sprinkle with the chopped basil and parmesan cheese. Stir everything together so that all the pasta is covered in sauce and it looks pretty. Serve immediately and enjoy.

Please do not despair if you do not have some wine left from a previous night. It is perfectly acceptable to buy a bottle of wine for this recipe and use the remainder of the bottle for drinking!

I like to serve this pasta with a a simple, fresh salad. This time I made the salad with: thinly sliced fennel, baby lettuce leaves, capers (optional), some good olive oil and a sprinkle of lemon juice. It really can be as easy as that!

DSC_0038

Thai green curry – with baby eggplant (makhua phuang)

Image

Have you ever wondered what those pea- like green balls in your green curry were? I know I did!
They taste quite bitter and are crunchy from the outside but have a soft interior made up of little seeds. Because of their bitterness they might not be for everybody, but I really like them. I do not only like them for their flavor, but also because they give the dish some extra texture.

So you can understand my excitement when I found a packet of green balls with a sticker that said baby eggplant on it, in my local Asian supermarket. Right then and there I decided that the green balls were coming home with me and that we were having green curry for dinner that night!

My usual strategy for cooking new things is to type the ingredient into Google or Pinterest and then read through a few attractive looking recipes for inspiration. Most of the time I decide to combine a few elements or ingredients of the recipes that I like and then come up with my own version.
This time my strategy did not quite work, because I could not find many recipes for baby eggplant. This made me conclude that baby eggplants are not as commonly used as I initially thought, which of course made me even more curious…

After a long and rather confusing Google-session I found out that the Thai baby eggplant is in fact a berry and grows in nearly all the tropical parts of the world ranging from Africa, Asia, Australia, and the Pacific Islands including Hawaii, Guam, and American Samoa. The Latin name for the baby eggplant is Solanum Torvum, but it is also known as: Devil’s Fig, Prickly Nightshade, Shoo-shoo Bush, Wild Eggplant, Pea Eggplant or Pea Aubergine. All very exotic and exciting names for such a little green ball, but I still did not know how to cook them…

Because my Google recipe-search did not leave me with much more than the fact that they are often used in Thai green curries, I decided that I just had to use my common sense.
As the balls are quite firm I figured that I had to cook them for at least 10 minutes in order to make them edible. Luckily it turned out that my cooking- time estimation was right and they tasted exactly like the baby eggplants I had before. Because I think my baby eggplant experiment worked out really well, I thought i would share my recipe. I hope you will enjoy it as much as I did and would love to hear your thoughts and comments!

Serves 2/3

Thumb- size fresh ginger (peeled and finely chopped)
1 shallot (finely chopped)
2 cloves of garlic (finely chopped)
1 chilly (finely chopped)
4 whole kaffir lime leaves
1 big tin of coconut milk (450ml)
250 ml water
2/3 tablespoons of good quality green curry paste

A bunch of baby eggplants (when picked of their stems 2 hands full)
1 chicken breast (sliced into thin strips)
+/- 15 tiger prawns (depending on the size)
1/2 eggplant (cut into small cubes)
1/2 red pepper (cut into thin strips)

Juice of 1/2 a lime
1 tablespoon of Thai fish sauce
A big bunch of Thai basil coarsely chopped

Put a wok (or deep skillet) on a high heat with some oil and stir fry the finely chopped ginger, garlic, chilly and shallot for 1 or 2 minutes until they get soft (not brown) and then add the green curry paste, the coconut milk, the kaffir lime leaves and the water and stir well.

Bring this liquid just up to the boil and add the baby eggplant together with the slices of chicken breast and the shrimps. Cook this for five minutes while stirring every once in a while.
Then add the cubed eggplant and the red pepper that you have cut into thin strips and let it all cook for another 5 minutes or so.

The curry looks quite liquid at this point, and even though it will become a bit thicker when more water evaporates, I prefer my curries this way because there is simply more sauce. If you like your curry to be thicker then just add less water.

When the dish looks done (if you are not sure, just try a baby eggplant) add the juice of half a lime, the fish sauce and the roughly chopped Thai basil and turn the heat off. Give it another good stir so all the flavors are well mixed into the dish and serve with either white (jasmine) rice or any type of your favorite noodles and enjoy!

Vietnamese fish dipping sauce/dressing

DSC_1158

During my trip to Vietnam earlier this year, I learned that the Vietnamese are crazy about their fish dipping sauce and use it in nearly all their recipes. I learned to make this dressing during a very fun and interesting cooking workshop in Ho Chi Minh city.

This sauce makes a fantastic fragrant dressing for any type of Asian salad but can also be used as a dipping sauce for vietnamese spring rolls.

This is how to make your own: (makes 1/4 of a cup)

2 tablespoons of water

1 tablespoon fresh lime juice

1 table spoon of sugar

1 table spoon fish sauce (Nuoc Mam)

1 teaspoon rice vinegar

1 teaspoon long deseeded and minced red chili

0.5/1 teaspoon minced garlic

In a bowl add lime juice, water, rice vinegar, sugar and fish sauce. Whisk until the sugar dissolves completely. Then add the chopped chili and the chopped garlic and mix again.

TIP: Use this sauce as a dressing for a tasty seafood glass- noodle salad.

This dressing is also used in the banana blossom salad from a previous post: https://thirstforfood.wordpress.com/2013/03/20/ho-chi-minh-vi…redded-chicken/

Vietnamese Banana Blossom Salad with shredded chicken

DSC_1204

This Vietnamese salad uses an ingredient called banana blossom. A banana blossom is basically the flower out of which a cluster of bananas will eventually grow. The outer leaves have a deep red/purple color, but the leaves inside the flower are a faint yellow color. The inner leaves of the flower taste a bit like the skin of a big yellow banana, but then a lot less bitter and horrible, if that makes sense? 

DSC_1347

I have not yet seen them in any Asian Supermarket in Amsterdam, but if you ever run into one,  here is how to make this delicious and exotic looking salad:

Vietnamese banana blossom salad with shredded chicken:

Ingredients: – serves 4

1 young banana blossom (400 gram) only the yellow inside leaves. (use the outside leaves as serving bowls)
500 ml iced water with two tablespoons of rice vinegar
2 chicken breast
1 carrot julienne cut
1 onion thinly sliced
1/2 green pepper cut into strips
10 laksa leaves thinly sliced (Rau Ram)
10 mint leaves (Hun Cay)
1 table spoon crushed peanuts
1 table spoon crispy fried shallots to garnish
60 ml fish dipping sauce (recipe in earlier post: https://thirstforfood.wordpress.com/2013/03/20/vietnamese-fish-dipping-sauce/

Place the chicken in a saucepan and cover with water. poach over medium heat for about 20 minutes. Remove from the heat and set aside to cool. When cooled shred the chicken along the grain into thin strips.
Cut the banana blossom in fine strips and soak in a large bowl with iced water for 20 minutes to remove the slimy residue and to prevent from discoloring. Then drain with a cheesecloth until dry.
Peel and finely slice the shallots and deep fry until light brown and golden and set aside.

Combine the banana blossom, chicken, onion, carrot, green pepper, fish sauce dressing, laksa leaves and peanuts in a large bowl and toss well. Arrange the salad on a serving platter and sprinkle with crispy fried shallots. Serve immediately and enjoy!